
A well-planned loft rooflight installation can change more than the brightness of a converted attic. It can make a low-ceilinged room feel usable, bring daylight into the centre of a home and create the open, contemporary finish buyers expect from a quality loft conversion. But cutting an opening into a roof is not a cosmetic alteration. The roof structure, drainage, insulation and final weatherproofing all need to work together.
For homeowners, the best results come from making the key decisions before work starts – not choosing a rooflight once the opening has already been measured.
Start with the room, not the rooflight
Think about how the loft will be used. A bedroom needs a different balance of privacy, opening function and solar control from a home office or bathroom. A rooflight above a stairwell may primarily bring daylight down through the house, while one in a principal bedroom should also provide a clear outlook and a practical means of ventilation.
Position matters just as much as size. A rooflight placed too high can deliver plenty of sky but little outward view when standing or sitting in the room. One placed lower in the roof slope can make the loft feel more connected to the outside, provided the sill height, safety requirements and furniture layout allow it. In a bedroom, consider where the bed, wardrobes and radiators will sit before fixing the position.
Orientation should be part of the discussion early on. South-facing glazing can provide welcome winter light but may lead to overheating in summer, particularly in a loft where warm air naturally rises. North-facing rooflights give softer, more consistent daylight. East and west aspects bring strong morning or afternoon sun, which can be ideal or inconvenient depending on the room.
Planning a loft rooflight installation
Most rooflights installed flush within an existing pitched roof can fall under permitted development rights. That does not mean every project is automatically exempt from formal permission. The property type, roof elevation, size and local restrictions all matter.
Planning permission is more likely to be relevant where the home is listed, within a conservation area, subject to an Article 4 direction, or where a rooflight is proposed on a prominent elevation. Rooflights should generally not project more than 150mm beyond the existing roof plane under permitted development rules, and side-facing openings may need obscure glazing and restricted opening positions. A dormer conversion is a different proposition altogether and often has more significant planning implications.
Building Regulations apply regardless of whether planning permission is required. They cover structural alterations, thermal performance, ventilation, fire safety and safe access. A competent installer or building control professional can confirm the requirements for the specific project. This is particularly valuable where a loft conversion is being created as a new habitable storey rather than simply upgrading an existing room.
Do not assume existing rafters can simply be cut
The roof may look straightforward from inside, but its load path is carefully arranged. Rafters, purlins, trusses and supporting walls all have a role. Creating an opening normally involves trimming the roof, with new timbers installed around the aperture to transfer loads safely.
The required detail depends on the roof construction and the rooflight size. Cutting into a traditional rafter roof is not the same as altering a prefabricated trussed roof. Trussed rafters should never be cut or altered without an engineer-designed solution, as seemingly minor changes can compromise the structure. A structural survey before ordering the unit avoids expensive changes later.
Choose a rooflight suited to the roof and the room
There is no single best rooflight for every loft. The right specification is one that fits the roof pitch, opening requirements and desired appearance while meeting the performance needs of the room.
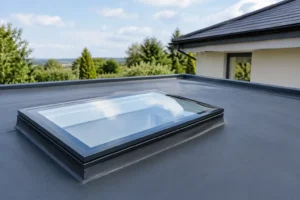
Centre-pivot roof windows are a popular choice because the sash can rotate for cleaning and controlled ventilation. Top-hung options provide a more open, unobstructed view when opened, which suits a loft bedroom or a space overlooking a garden. Fixed rooflights work well where daylight is the priority and another compliant ventilation route is available.
For a contemporary architectural look, a conservation-style rooflight may be appropriate on period properties, while slim-framed aluminium designs can complement modern extensions and loft conversions. The visible frame, external flashing and glazing divisions should all be considered against the character of the property rather than chosen in isolation.
Glazing specification deserves close attention. A double-glazed unit with low-emissivity glass helps retain heat, while solar-control glazing can reduce excessive solar gain on exposed roofs. Laminated inner panes can improve safety where glass is installed overhead. Acoustic glazing may be worthwhile near busy roads, rail lines or flight paths.
Higher-performance glass can add cost, and very dark solar-control coatings can slightly reduce the amount of visible light. The aim is not simply to select the highest specification available, but to create a comfortable room throughout the year.
Get insulation, ventilation and condensation control right
A loft conversion has less margin for error than many other rooms. Warm, moist air rises, and poorly detailed roof openings can become cold spots where condensation forms. Over time, that can affect plaster finishes, timber and indoor air quality.
During installation, insulation must be carefully continued around the rooflight opening. Gaps in the thermal envelope can reduce the benefit of high-performance glazing. The rooflight should be fitted with the correct insulated collar or equivalent detail where required, and the internal lining should be formed to encourage daylight while maintaining continuity of insulation and vapour control layers.
Ventilation is equally important. An opening rooflight can provide valuable purge ventilation, but it may not meet every requirement on its own. Bathrooms and kitchens usually need mechanical extract ventilation, and a habitable loft room may need a considered strategy for background ventilation as well as rapid air changes. Trickle vents, opening lights and extract fans each have a role depending on the layout.
If overheating is a concern, external blinds are generally more effective than internal blinds because they stop a proportion of the solar energy before it reaches the glass. Internal blinds still offer useful privacy, glare reduction and a finished appearance. For difficult-to-reach rooflights, electric or solar-powered opening and blind controls can be a practical investment.
Weatherproofing is where installation quality shows
A rooflight is only as reliable as its integration with the roof covering. The correct flashing kit must match the rooflight model, roof pitch and material – whether slate, plain tiles, interlocking tiles or another covering. Flashings are designed to direct water around the frame and back onto the roof surface without relying on sealant as the primary defence.
A good installation includes correctly formed underfelt, battens and drainage paths around the opening. Tiles or slates should be cut and reinstated neatly, with enough clearance to avoid restricting water flow. On a slate roof, this work requires particular care to preserve the weathering detail and avoid cracked slates.
Be wary of a quote that is vague about flashing, internal making-good or disposal of removed materials. It may look less expensive at first, but those omissions can become unexpected costs. Ask who is responsible for structural trimming, roofing works, plastering, electrics for powered controls and certification. A clear scope protects everyone.
Plan the installation sequence carefully
Rooflight work is often best completed before internal plastering and final decoration, but after the roof structure has been confirmed. If a larger loft conversion is underway, coordinate the rooflight position with steels, stair openings, plumbing routes and electrical plans. This prevents clashes and helps the internal lining look deliberate rather than squeezed into the remaining space.
Weather also affects programme planning. A professional team will aim to keep the roof open for as little time as possible and protect the interior during the works, but heavy rain or high winds may make installation unsafe. Allow sensible contingency rather than scheduling decorating or furniture delivery immediately afterwards.
For supply-only projects, check the product dimensions against the structural opening and confirm what is included. The rooflight, flashing kit, insulation collar, vapour barrier connection and blinds are not always supplied as one package. The cheapest unit is not necessarily the best value if essential installation components are added later.
A brighter loft should also be a better-performing one
The success of a rooflight is felt every day: the daylight on the landing, the fresh air in a top-floor bedroom and the sense that the room has gained height and space. Those benefits depend on careful specification and competent fitting, not just a good-looking pane of glass.
Before committing to a loft rooflight installation, take time to confirm the structural design, permissions, glazing performance and installation scope. With those foundations in place, the finished rooflight can provide a bright, secure and thermally efficient addition to your home for many years.